Today, I had my first solo game in a couple of months, thanks to Covid-19 rearing its ugly head again, and the UK being back in a limited lockdown.
I really enjoy Star Wars skirmishing, so had another outing for my Rebels!!!
I wanted to see if a smaller force of Rebels would fare as well as the whole crew did in the last game (LINK)
The scenario I chose was a rescue mission.
Fulcrum has contacted the Rebels, informing them that the Empire has captured a rebel courier, and are holding her in a container, within an industrial settlement, awaiting a transport to take her to the Empire's sector base.
Hera Syndulla tasks Commander Ezra Bridger, to take a small team in to rescue the courier before this happens. Captain Rex, and Sabine Wren offer to join the expedition, and are accepted.
Inserted by a captured Imperial shuttle, the Rebels approach the settlement...
My Dining room table again serving as the battlefield!
The container units at the end of the settlement. (The white markers are portal markers, where enemy forces could appear from)
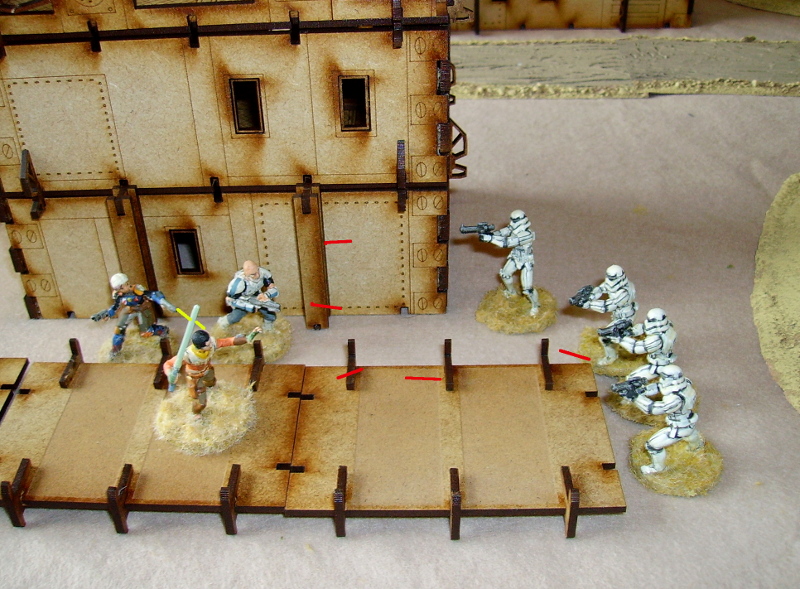
Sabine checks the road, covered with Portal Markers on both sides!
Sabine: 'I see one container at the end of the road, how do you want to get there?
Ezra: 'I think we should go round the left and try to stay out of sight!'
Rex: 'It all looks clear down here!- though looks can be deceptive!'
Indeed, a counter is able to see them as they round the first building. When the enemy are unaware, the chance of any enemy appearing with a '1' counter is small!
Keeping close to the building, the Rebels advance...
Sabine watches their rear.
They approach the counter, it has to to move if they get within 8".
The counter retreats to another covering position.
Rex leads the team to the next corner.
Ezra considers going on the roof, but that would make him too visible!
No matter how the team advances, they will have to become visible to at least 1 Portal Marker.
The one near the power generator is a value 2.
I throw a 5...
This means the Empire is now active!...
A patrol of 4 Stormtroopers appears!
They move forward to cover behind a walkway.
They are soon shooting at the Rebels who take cover at the other end of the walkway.
This unfortunately also activates another Portal marker across the road...
...and dislodges the first marker again back to the Power station.
Ezra acts as a shield while the other Rebels shoot.
Despite this, Sabine is forced to duck back.
Not before most of the newly arrived Stormtroopers have been too!
As the firefight continues, more Imperials appear at the other Portal Marker...
...the Rebels are being enfiladed!
The new Stormtroopers have an NCO commanding them.
In desperation, Ezra leaves Sabine and Rex, in an attempt to stem the tide of Imperial reinforcements! Rex is forced to duck back, and the Rebels are lucky not to suffer more damage!
Sabine's fire is pinning down some of the Imperial troopers, but she can do no more.
Ezra reaches the Stormtroopers!
This is the moment of truth, can Rex and Sabine stand against the massed Imperial troops while Ezra deals with the largest group?!
Ezra engages one of the groups...
...and downs 3 of them!
Sabine calls for help, as more Stormtroopers appear on her flank!
Ezra is making short work of his groups of Stormtroopers, the survivors retreat!
With the original Stormtroopers no longer shooting, Rex and Sabine move round to engage the flanking force, They have done very well to escape being wounded!
Sabine: 'EZRA!'
Ezra sticks to the job in hand, but wishes he could rejoin his friends!
The Imperial forces are pressing Sabine and Rex hard...
Ezra races back...
Ezra: 'Sabine, you and Rex move towards me and we will get them as they come round the corner!'
They sidle down behind the walkway, getting out of sight of the Portal Markers!
Ezra: 'OK Sabine, I got this!'
Ezra wreaks chaos!
Unfortunately, his attack activates another group of Stormtroopers.
Rex and Sabine move to support Ezra...
...quite effectively!
Ezra is becoming aware that he cannot keep up with the flood of Stormtrooper reinforcements, and considers another strategy...
Yet another group of Stormtroopers appears from that corner!
Ezra retreats, while Sabine and Rex argue about their relative totals of Bucket Heads!
Ezra takes his friends at the run along the walkway.
The nonplussed Stormtroopers edge forward, weapons at the ready.
Rex again leads the Rebels back to their ambush position.
The Stormtroopers appear!
Despite a lot of firing, only a single one of the Stormtroopers is forced to duck back!
As the mass of Stormtroopers appears, Ezra attacks again.
Ezra only gets one Stormtrooper, but forces several back...
...He then attacks another group while his friends deal with the rest.
Rex and Sabine soon have ascendancy!
Ezra knocks 2 Stormtroopers down, the rest fall back.
Once again, Ezra's charge brings more Stormtroopers up in support!
Ezra falls back again!...he remembers Kanan's Holocron training video, with Anakin Skywalker advocating patience. Ezra: 'I Understand!'
Instead of going out to meet the newest Stormtroopers, he settles for deflecting shots while Sabine and Rex exchange fire with the troopers.
One of the 2 survivors of Ezra's attacks is forced to duck back...
...the other is killed.
The new group of Stormtroopers renews the conflict.
Ezra launches a short attack, keeping out of sight of those Pesky Portals!
All he does is wound one and force one back...
Again, keeping in cover from the Portals he attacks a small clump of Stormtroopers.
This time he gets 2, Rex and Sabine kill one of the others.
Ezra wisely lets the survivors retreat. Patience.
This overview show the position of the Rebels, and the Portal Markers.
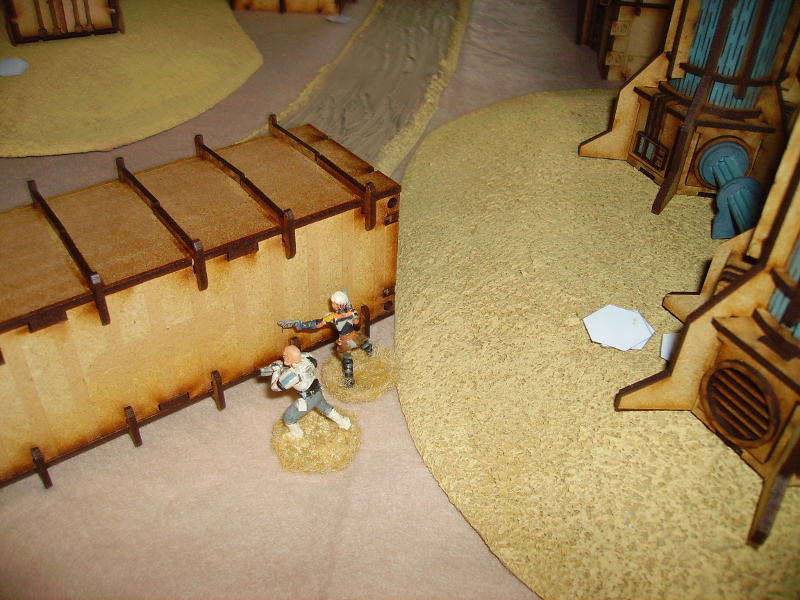
The Rebels move to the edge of the building.
Then they dash across the gap without being seen.
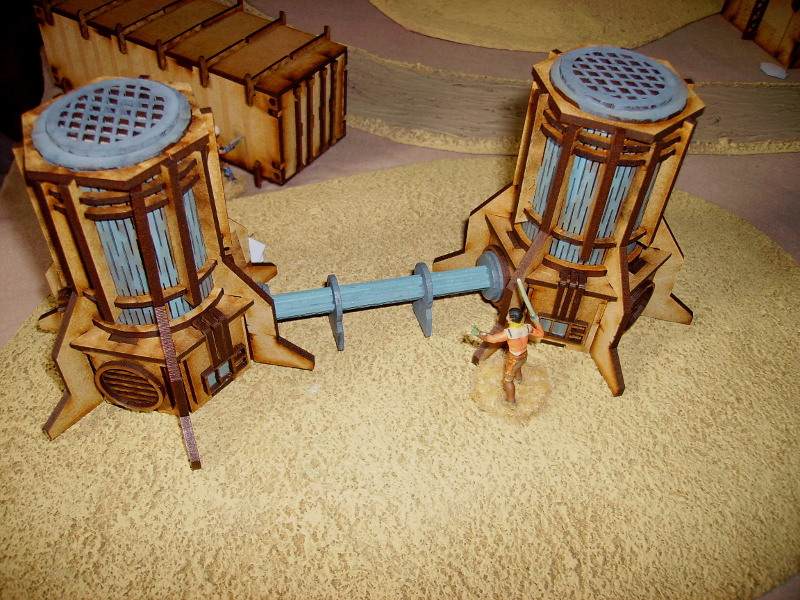
Shielded by the hill and power station, our heroes edge behind the settlement.
They approach the first container.
Ezra stays behind the Power Station...
...sending Rex and Sabine to check the container.
The Portals behind the Power Station now have to move.
Ezra 'Force Runs' to displace the Portal markers near the containers.
Ezra races for the second container (Rex had determined the first was empty)
Ezra frees the grateful courier...
...and leads her down to cover, where they are joined by Rex and Sabine.
As they travel down the road...a pile of displaced Portal Markers are activated...
Only 4 Stormtroopers!
They advance, shooting, at the escaping Rebels.
The Rebels, caught in the open, fire back furiously.
Ezra, wishing to stop the Portal pile bringing any reinforcements, attacks.
Ezra cuts 3 down quickly...
The survivor makes good his escape!
The Portal markers are forced back to a poorer position.
As the victorious Rebels reach the edge of the settlement, the Rebel Courier leaves them.
Sabine: 'Where are you going? our pick up is THIS way?!'
The 'Courier' morphs into a wrinkled faced bounty hunter.
Ariaka Parassiti: 'Thanks Rebels!, I couldn't have escaped without you!'
The surprised Rebels watch as the alien moves away, covering them with her blaster...
Sabine: 'Ezzzra....?!'
Ezra: 'I Know!...What is Hera going to say...!!!'
That was a fun game! I was soo verry lucky to get away without any casualties at a couple of points! Having the container holding the captive random and the possible rescuee random too, added some surprises!!!


I don't game Star Wars but love the early Movies!
ReplyDeleteGreat looking figures and set up, thanks for posting!
Thanks very much, I am happier doing Star Wars solo than almost any genre during lockdown, but really must try to do some different games sometime....!!!!
Delete"Star Wars solo" was that an intentional pun? Even if not top points!
Delete😃
It was a simple error, I would be a leia to say otherwise!
Delete