Yesterday, we did yet another playtest of Beneath the Lily Banners. Having scrapped the 'Support' rule in the Morale section of BTLB and introducing our own:
Supported: Having 2 units of your own brigade (not if they are routing/retreating) within 6" if infantry, 9" if horse.
Neither Supported or Isolated: Having a single friendly unit (as above) within 6" if infantry, 9" if horse. This may be from the same or a different brigade.
Isolated: Having no friendly unit, or only friendly units which are routing or retreating, within 6" if infantry, 9" if horse.
We were hoping this simple change would finally sort out the game for us!
The game was designed for the six people we were expecting. However, Phil and Rod decided to watch Newcastle United lose instead!!!
Ken, chatting with Ian. They commanded the 'Confederate forces'.

The battlefield, the confederates chose to deploy on the clear side!

The far side of the table was woody, so deployment would be difficult.

The Confederates: A Danish Horse brigade on the left.

A field gun, with an elite Danish Horse brigade to their right.

Ken's 'Imagi-nations' foot brigade...
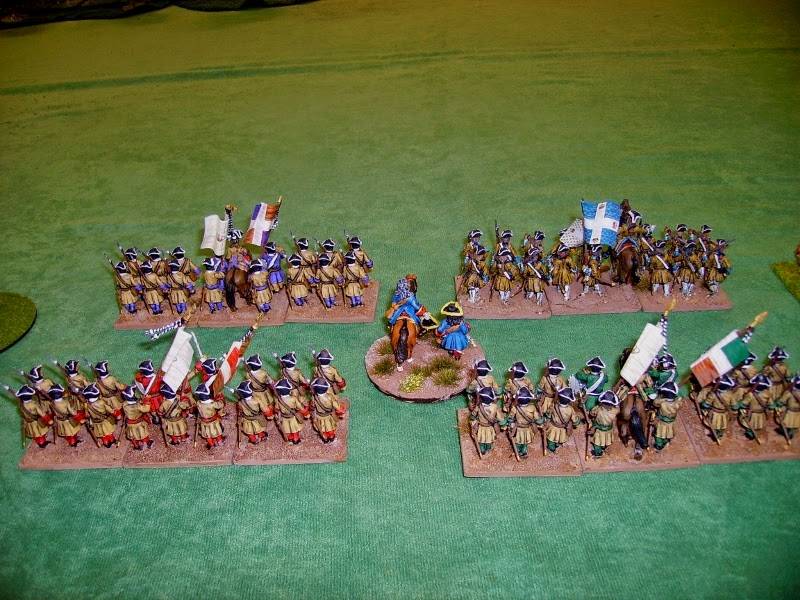
Very prettily painted!

Lacking infantry, Ian borrowed 4 of my French battalions- Royal Italien, Salis (Swiss) Dillon (Irish) and Greder (German).

To their right, an Austrian infantry brigade...

...flanked by an Austrian Kuirassier brigade on the far right, behind a wood.

Opposite them, the Anglo/Franco Bavarians deployed with a British brigade on the left, 2 French brigades holding the centre...

I did not deploy anything in the dense wood on our deployment edge!


The first turn saw both sides get a minimum 1/4 of units able to move!

The Austrian gun fired...

close but no 10's...
close but no 10's...

The advancing Gendarmerie went unscathed!

The English infantry advanced too, to prevent the Austrian kuirassiers turning their flank, unsupported as they were by cavalry of their own.

The Danish foot opposite the Gendarmes remained halted.

The traitorous ex French also advanced against our centre, but not much else happened this turn!

The British advance went unhampered by...

...any Austrian movements.

Finally, I was able to advance some of my French infantry, led by 2 battalions of the Gardes Francaise.
Finally, I was able to advance some of my French infantry, led by 2 battalions of the Gardes Francaise.

Ken's Imagees and some of La Legion des etrangers moved to attack my French. Things were hotting up!

The Danish horse seemed happy to let their gun do all their fighting...

Nyah! 2 hits!

The Gendarmes de Flandres panicked and diced to retreat.

Another volley halted the Gendarmes Anglais next turn...Ken's shooting was phenomenal!

Marshal Villers and general Zurlauben were running out of Gendarmes to attack with!

Next shot though...two 1's

saw the Austrian gun misfire!
saw the Austrian gun misfire!

Back in the centre, the Anglo French were aligning with the Confederate infantry. The Austrians were deployed sacrificing depth for width.

I reserved my right wing infantry to prevent the Imagi-troops outflanking me!

Finally, I got to advance my Bavarians.The Gendarmes took advantage of the lack of Austrian artillery to advance too.

The (so far!) untouched Gendarmes Ecossaise now charged the Danish horse, who also charged.

The Danes held the rest of their squadrons back.

Sadly (for us!) - The Austrian gun cleared and began pounding us again!

In the centre, the Confederate Swiss and Irish engaged the French Guards.

The British waited for now, to see if the Austrians would attack.

The French Gendarmes, meanwhile, easily routed their Danish opponents...

..and chased them off the table!

The French Guards began to beat the Confederate infantry opposite.

Back on the cavalry wing, one of the Bavarian brigades moved to attack the Danish guard cavalry, my field gun, having not fired yet, moved to enfilade Ken's infantry.

The French generals advanced to support the coming cavalry clash

Vive la Roi!

In the centre, the French Guards here holding up well.

The Confederate foot were losing more.

Back with the cavalry, the Gendarmes de Flandres failed to charge, and were wiped out by their Danish opponents.
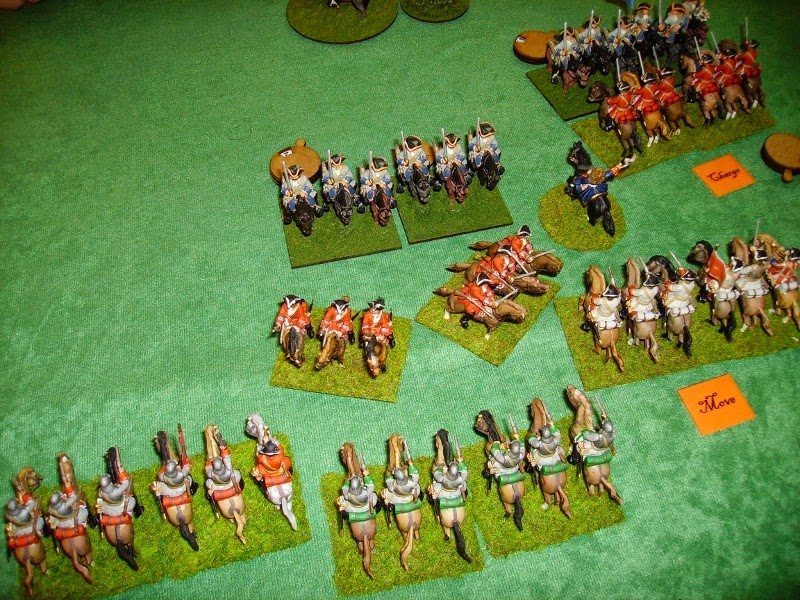
The other units routed the other 2 squadrons though!

Despite taking losses from the #?/*+*# Austrian gun! - My Bavarian horse moved to wipe out the last Danish squadron.

My last brigade now began trading shots with the Italians, and one of Ken's battalions.

We won again! The Italians became shaken, this was my chance!
 La Marine charged with the bayonet, and the Italians broke!, the lack of a second line now left a hole in the Confederate centre.

My last brigade now began trading shots with the Italians, and one of Ken's battalions.
We won again! The Italians became shaken, this was my chance!
This was the end for the Confederates, as the British infantry advanced and began to outshoot the Austrians, with the French winning in the centre, and the 2:1 advantage on the cavalry wing enjoyed by the Franco Bavarians, they wisely decided to withdraw.
I think we are pretty well sorted with the rules now, the Support rule modification seemed to work, and we had a good game!
Never harms for my French to win either!!! (At least now and again)
Superb looking game chaps!!
ReplyDeleteThanks Ray! - I always think 'Lace Wars' games are really pretty!
DeleteBrilliant write-up Richard!
ReplyDeleteYes, I was rather handy with the cannon! usually I'm on the receiving end.
I forgot I had these figures painted - admittedly not cuirassiers or Dragoons. Do they fit in BTLB era?
ReplyDeletehttp://napoleonicadventures.blogspot.co.uk/2014/04/minden-hussars.html
Hi Ken! - We all have good days with the artillery, I have had my fair share of them!!!
DeleteThose infantry are perfect for the later period of BTLB, which is designed for battles from about 1685 - 1725. They looked splendid!